本地搭建分布式微服务基础环境(一键启动)
序言
分布式微服务架构是分层的,每一层的组件选择高度依赖于具体实现方案和技术生态。比如,
Java技术栈中,Spring Cloud Alibaba或Spring Cloud Netflix(历史方案),属于一站式解决方案,文档丰富;- 云原生技术栈中,
Kubernetes(服务编排)+Istio(服务网格)+Envoy(代理),无侵入治理,自动注入Sidecar; - 异构语言(
Go/Python/C++)技术栈中,gRPC(跨语言RPC)+Consul(服务发现)+OpenTracing(链路追踪),语言无关,协议高效。
实际项目中,所有这些技术栈涉及到的组件并不是必须全部使用,可以根据业务场景合理组合搭配,比如大型团队技术栈使用异构语言(比如Java、Go、C++、Python等)搭建服务,也可以结合K8S编排异构服务架构,而中小项目可能只需要注册中心+网关+配置中心的核心三件套。
不管是采用以上哪种技术栈来实现分布式微服务,用到的核心功能模块都一样,比如服务协同(服务注册/发现、配置中心)、流量治理(负载均衡、服务网关、限流/熔断/降级)、数据层存储、消息队列、服务可观测(链路追踪、监控告警、集中式日志等)、自动化运维(容器化部署、CICD等)。
由于篇幅有限,本文不过多介绍各个功能模块的技术选型,而是从各个模块涉及到的中间件和框架的学习角度出发,记录本地搭建一键启动分布式微服务基础环境的过程。这个运行环境仅供学习使用,容易上手,和企业服务的线上运维部署是两码事。
下面的
microservice-dev.box镜像,在CentOS 7的基础上安装了Docker、Docker-compose、MySQL、Redis、Nginx(Openresty)、ZooKeeper、Nacos、Eureka、Spring-Cloud-Configuration、Zuul、RocketMQ,如有需要,可在此镜像基础上另行修改或添加即可。
Git+Vagrant+VirtualBox三剑客
VirtualBox是虚拟机管理工具,Vagrant可以集成VirtualBox、Vmware,直接部署虚拟机镜像,Git(Windows系统需要)在这里是用户和Vagrant交互的Unix Shell命令行界面。因为Vagrant没有图形界面,安装完成后也没有桌面快捷方式,操作Vagrant只能通过命令行方式来做。下载链接如下,
Vagrant是一个比较流行的虚拟机管理软件,使用Vagrant可以让我们用命令直接从云上下载虚拟机的镜像,并进行创建和管理等。它支持Windows/Linux/Mac,可以把配置好的环境打包成一个box镜像,方便移植和分享。
部署、启动、访问、关闭、打包
上述准备工作做好后,下载基础系统的
Vagrant box镜像,比如centos.box,镜像库参见Vagrant Public Registry 地址1、Vagrant Public Registry 地址2;创建并切换到
Vagrant工作目录,比如/e/virtual/work;添加系统基础镜像到
Vagrant;1 2 3 4 5 6 7 8 9 10 11 12 13 14 15 16
// 添加镜像 $ vagrant box add my_centos /e/software/virtual/centos-7.2.box ==> box: Box file was not detected as metadata. Adding it directly... ==> box: Adding box 'my_centos' (v0) for provider: box: Unpacking necessary files from: file:///E:/software/virtual/centos-7.2.box box: ==> box: Successfully added box 'my_centos' (v0) for ''! // 查看镜像 $ vagrant box list my_centos (virtualbox, 0) // 删除镜像 $ vagrant box remove my_centos Removing box 'my_centos' (v0) with provider 'virtualbox'... // 注:vagrant add remove删除box,会自动帮你生成vagrantfile。
- 初始化虚拟机
1
2
3
4
5
6
 $ vagrant init my_centos
 A `Vagrantfile` has been placed in this directory. You are now
 ready to `vagrant up` your first virtual environment! Please read
 the comments in the Vagrantfile as well as documentation on
 `vagrantup.com` for more information on using Vagrant.
 // 初始化镜像之后,在当前目录生成一个虚拟机的配置文件Vagrantfile,通过该配置文件,可以配置端口映射、虚拟机的IP、目录映射等。
- 修改
Vagrantfile,配置创建包含三个节点的虚拟机集群;1 2 3 4 5 6 7 8 9 10 11 12 13 14 15 16 17 18 19 20 21 22 23 24 25 26 27 28
# -*- mode: ruby -*- # vi: set ft=ruby : # Vagrantfile API/syntax version. Don't touch unless you know what you're doing! VAGRANTFILE_API_VERSION = "2" Vagrant.configure(VAGRANTFILE_API_VERSION) do |config| (1..3).each do |i| config.vm.define vm_name = "cdh#{i}" do |config| config.vm.provider "virtualbox" do |v| # v.customize ["modifyvm", :id, "--name", vm_name, "--memory", "4096",'--cpus', 1] v.customize ["modifyvm", :id, "--name", vm_name] # v.customize ["modifyvm", :id, "--memory", "4096"] v.customize ["modifyvm", :id, "--memory", "8192"] v.customize ["modifyvm", :id, "--cpus", "2"] end config.vm.box = "my_centos" config.vm.hostname =vm_name config.ssh.username = "root" config.ssh.password = "vagrant" # config.ssh.shell = "powershell" #config.ssh.shell = "bash -l" config.vm.network :private_network, ip: "192.168.56.12#{i}" config.vm.provision :shell, :path => "bootstrap.sh" end end end1 2 3 4 5 6 7 8 9 10 11 12 13 14 15 16 17 18 19 20
#!/usr/bin/env bash # The output of all these installation steps is noisy. With this utility # the progress report is nice and concise. echo "Update /etc/hosts" cat > /etc/hosts <<EOF 127.0.0.1 localhost 192.168.56.121 cdh1 192.168.56.122 cdh2 192.168.56.123 cdh3 EOF echo "Disable iptables" setenforce 0 >/dev/null 2>&1 && iptables -F ### Set env ### echo "export LC_ALL=en_US.UTF-8" >> /etc/profile cp /usr/share/zoneinfo/Asia/Shanghai /etc/localtime
1
2
3
4
5
6
7
 $ ls -al
 total 2004977
 drwxr-xr-x 1 msy 197121          0 Jul 22 16:37 ./
 drwxr-xr-x 1 msy 197121          0 Jul 22 15:46 ../
 drwxr-xr-x 1 msy 197121          0 Jul 18 11:41 .vagrant/
 -rw-r--r-- 1 msy 197121       1083 Jul 18 13:13 Vagrantfile
 -rwxr-xr-x 1 msy 197121        466 Jul 18 11:45 bootstrap.sh*
- 启动虚拟机
1
2
3
4
5
6
7
8
9
10
11
12
13
14
15
16
17
18
19
20
21
22
23
24
25
26
27
28
29
30
31
32
33
34
35
36
37
38
39
40
41
42
43
44
45
46
47
48
49
50
51
52
53
54
 // 方便起见,也在宿主机上做下host配置
 // 192.168.56.121 cdh1
 // 192.168.56.122 cdh2
 // 192.168.56.123 cdh3

 // 只启动部分节点
 $ vagrant up cdh1
 Bringing machine 'cdh1' up with 'virtualbox' provider...
 ==> cdh1: Importing base box 'my_centos'...
 ==> cdh1: Matching MAC address for NAT networking...
 ==> cdh1: Setting the name of the VM: work_cdh1_1752815726066_39742
 ==> cdh1: Clearing any previously set network interfaces...
 ==> cdh1: Preparing network interfaces based on configuration...
     cdh1: Adapter 1: nat
     cdh1: Adapter 2: hostonly
 ==> cdh1: Forwarding ports...
     cdh1: 22 (guest) => 2222 (host) (adapter 1)
 ==> cdh1: Running 'pre-boot' VM customizations...
 ==> cdh1: Booting VM...
 ==> cdh1: Waiting for machine to boot. This may take a few minutes...
     cdh1: SSH address: 127.0.0.1:2222
     cdh1: SSH username: root
     cdh1: SSH auth method: password
     cdh1: Warning: Connection aborted. Retrying...
     cdh1: Warning: Connection reset. Retrying...
     cdh1: Warning: Remote connection disconnect. Retrying...
     cdh1:
     cdh1: Inserting generated public key within guest...
     cdh1: Removing insecure key from the guest if it's present...
     cdh1: Key inserted! Disconnecting and reconnecting using new SSH key...
 ==> cdh1: Machine booted and ready!
 ==> cdh1: Checking for guest additions in VM...
     cdh1: The guest additions on this VM do not match the installed version of
     cdh1: VirtualBox! In most cases this is fine, but in rare cases it can
     cdh1: prevent things such as shared folders from working properly. If you se
 e
     cdh1: shared folder errors, please make sure the guest additions within the
     cdh1: virtual machine match the version of VirtualBox you have installed on
     cdh1: your host and reload your VM.
     cdh1:
     cdh1: Guest Additions Version: 4.3.30
     cdh1: VirtualBox Version: 6.1
 ==> cdh1: Setting hostname...
 ==> cdh1: Configuring and enabling network interfaces...
 ==> cdh1: Mounting shared folders...
     cdh1: E:/virtual/work => /vagrant
 ==> cdh1: Running provisioner: shell...
     cdh1: Running: C:/Users/msy/AppData/Local/Temp/vagrant-shell20250718-11956-s
 0bcqx.sh
     cdh1: Update /etc/hosts
     cdh1: Disable iptables

 // 也可以启动全部虚拟机节点
 $ vagrant up
1
2
3
4
5
6
7
8
9
10
11
 // 查看虚拟机运行状态
 $ vagrant status
 Current machine states:

 cdh1                      running (virtualbox)
 cdh2                      running (virtualbox)
 cdh3                      running (virtualbox)

 This environment represents multiple VMs. The VMs are all listed
 above with their current state. For more information about a specific
 VM, run `vagrant status NAME`.
到现在,使用
Vagrant管理的VirtualBox虚拟机已经部署好并启动了,可以用ssh登录访问虚拟机了,Windows用户可以选择使用mobaxterm或者xshell来访问;1 2 3 4 5
// ssh登录 $ vagrant ssh # 切换到开发目录(宿主机上的Vagrantfile所在的工作挂载目录) $ cd /vagrant
看下效果;
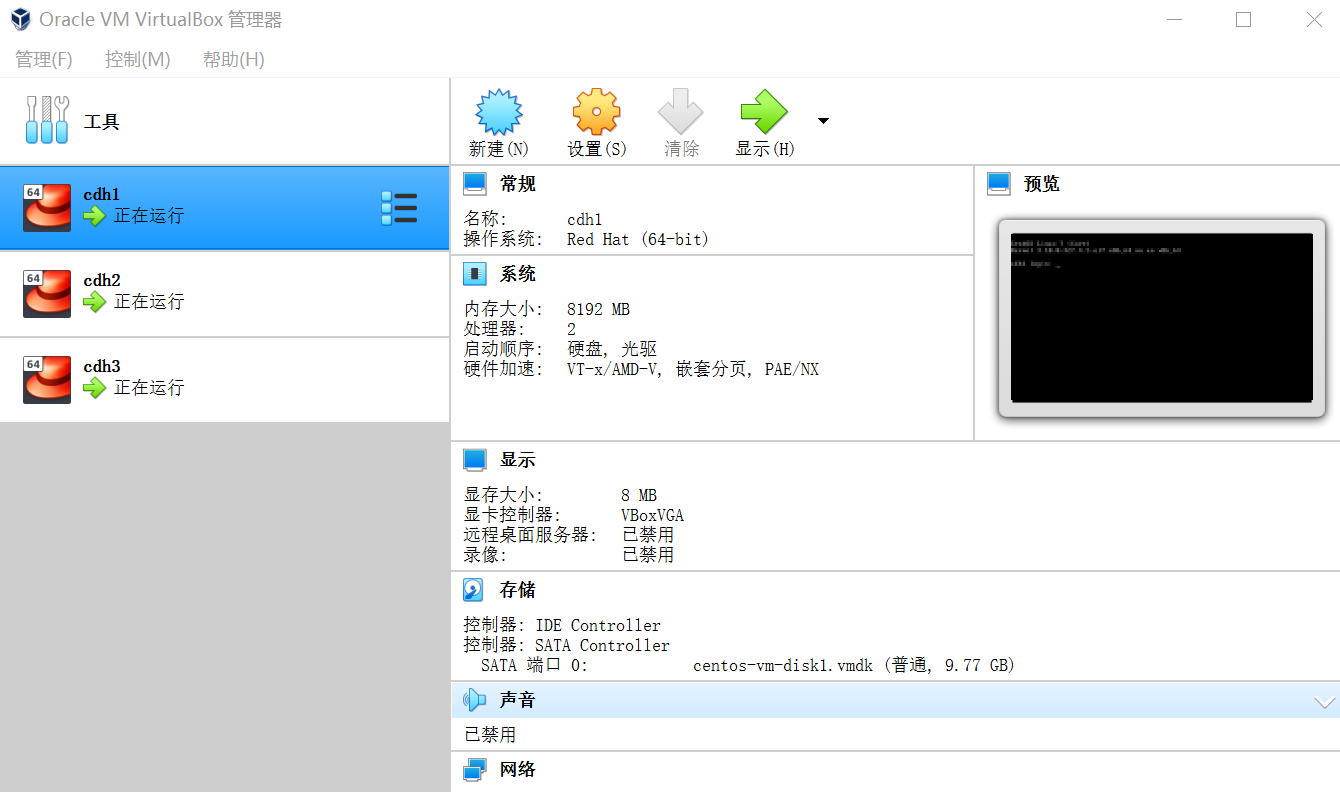 VirtualBox 效果图
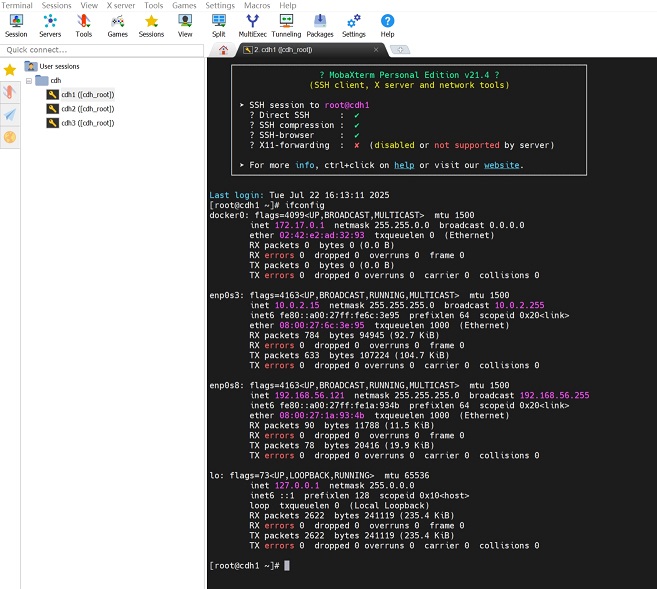 ssh 效果图
安装配置好分布式微服务开发环境后,可以打包备份成镜像(方便移植分享)。这个过程需先关闭虚拟机,会耗费一点时间,耐心等待下。
1
2
3
4
5
6
7
8
9
10
11
 // 关闭虚拟机
 $ vagrant halt
 ==> cdh3: Attempting graceful shutdown of VM...
 ==> cdh2: Attempting graceful shutdown of VM...
 ==> cdh1: Attempting graceful shutdown of VM...

 // 打包box镜像(备份)
 $ vagrant package --base cdh1 --output  microservice-dev.box
 ==> cdh1: Clearing any previously set forwarded ports...
 ==> cdh1: Exporting VM...
 ==> cdh1: Compressing package to: E:/virtual/work/microservice-dev.box
1
2
3
4
5
6
7
8
 $ ls -lah
 total 2.0G
 drwxr-xr-x 1 msy 197121    0 Jul 22 16:37 ./
 drwxr-xr-x 1 msy 197121    0 Jul 22 15:46 ../
 drwxr-xr-x 1 msy 197121    0 Jul 18 11:41 .vagrant/
 -rw-r--r-- 1 msy 197121 1.1K Jul 18 13:13 Vagrantfile
 -rwxr-xr-x 1 msy 197121  466 Jul 18 11:45 bootstrap.sh*
 -rw-r--r-- 1 msy 197121 2.0G Jul 22 16:39 microservice-dev.box
其他常用命令
1
2
3
4
5
6
7
8
9
10
11
12
```terminal
// 销毁当前虚拟机,不需要的虚拟机最好销毁,释放存储空间
$ vagrant destroy cdh3
    cdh3: Are you sure you want to destroy the 'cdh3' VM? [y/N] y
==> cdh3: Destroying VM and associated drives...

// 修改Vagarntfile文件后,重启虚拟机,重新加载
$ vagrant reload (xxx)

// 暂时挂起虚拟机
$ vagrant suspend (xxx)
```
虚拟机也能科学上网(代理)
在开发过程中,经常需要科学上网,比如用
docker-compose方式安装RocketMQ时需要拉对应docker镜像,国内源都不可用。
在宿主机上通过VirtualBox运行CentOS7虚拟机,若宿主机已配置科学上网(代理),可以让虚拟机共享代理。具体操作步骤如下,
- 检查虚拟机网络模式配置
- 调整虚拟机设置,让宿主机和虚拟机互相
ping通,比如打开虚拟机设置 → 网络 → 适配器页面,选择NAT模式(默认即可); - 若需更高灵活性,可改用桥接模式,但需手动配置虚拟机
IP与宿主机同网段。
- 调整虚拟机设置,让宿主机和虚拟机互相
- 通过宿主机代理转发
- 调整宿主机代理配置,宿主机开启代理软件(如
ClashX等)的允许局域网连接选项(ALLOW LAN); - 查找宿主机上的代理软件端口,可以通过任务管理器找到进程
PID,执行netstat -ano | findstr <PID>,找到对应端口。也可以打开网络和Internet设置 → 代理页面,直接查看代理使用的端口,注意宿主机代理屏蔽的网段不要命中虚拟机IP。
- 调整宿主机代理配置,宿主机开启代理软件(如
使用宿主机
IP+代理监听端口,简单测试是否可达1 2 3 4 5
# 测试case如下 # 代理在宿主机上开着,假设宿主机IP:Port是192.168.56.12:12334 # curl -i http://宿主机IP:代理监听端口 https://www.google.com $ curl -i http://http://192.168.56.12:12334 https://www.google.com HTTP/1.1 200 OK
测试通过后,直接配置到
CentOS的全局环境变量,并做最后测试1 2 3 4 5 6 7 8
# 在CentOS7中设置环境变量 # export http_proxy="http://宿主机内网IP:代理端口" # export https_proxy="http://宿主机内网IP:代理端口" # 临时生效或写入/etc/profile持久化 $ vi /etc/profile export http_proxy=http://192.168.56.12:12334 export https_proxy=http://192.168.56.12:12334 $ source /etc/profile
使用下面的命令再测试下,能返回
200就说明虚拟机的科学上网配置成功了1 2
$ curl -i https://www.google.com HTTP/1.1 200 OK
设置docker专用磁盘
docker拉镜像老是报超时问题,具体信息如下,
经过排查发现,镜像源可以正常访问,网速、CPU和内存也不是瓶颈,而是磁盘空间涨到了100%。
结论:docker镜像占用空间太大,导致磁盘不够用了,需要把docker镜像单独存储到一块磁盘上。
目标:找一块单独的磁盘来挂载/var/lib/docker目录,专门用来存储docker数据。
查看磁盘,发现默认没有
/dev/sdb(另一块单独的磁盘)1 2 3 4 5 6 7 8 9 10 11 12 13 14 15 16 17 18 19 20 21 22 23
// 查看磁盘 # fdisk -l Disk /dev/sda: 10.5 GB, 10485760000 bytes, 20480000 sectors Units = sectors of 1 * 512 = 512 bytes Sector size (logical/physical): 512 bytes / 512 bytes I/O size (minimum/optimal): 512 bytes / 512 bytes Disk label type: dos Disk identifier: 0x0000ca5e Device Boot Start End Blocks Id System /dev/sda1 * 2048 1026047 512000 83 Linux /dev/sda2 1026048 20479999 9726976 8e Linux LVM Disk /dev/mapper/centos-root: 8866 MB, 8866758656 bytes, 17317888 sectors Units = sectors of 1 * 512 = 512 bytes Sector size (logical/physical): 512 bytes / 512 bytes I/O size (minimum/optimal): 512 bytes / 512 bytes Disk /dev/mapper/centos-swap: 1048 MB, 1048576000 bytes, 2048000 sectors Units = sectors of 1 * 512 = 512 bytes Sector size (logical/physical): 512 bytes / 512 bytes I/O size (minimum/optimal): 512 bytes / 512 bytes
在
Vagrant启动时自动为VirtualBox虚拟机添加20GB的/dev/sdb硬盘- 使用
VirtualBox GUI或者VBoxManage命令,预先创建磁盘文件;VirtualBox GUI,打开虚拟机 → 设置 → 存储界面,创建新的磁盘;VBoxManage命令
1
  VBoxManage createhd --filename box-disk002.vdi --size 20480
在
Vagrantfile中挂载新创建的磁盘;1
v.customize ["storageattach", :id, "--storagectl", "SATA Controller", "--port", "1", "--device", "0", "--type", "hdd", "--medium", "E:\\virtual\\boxes\\cdh1\\box-disk002.vdi"]
执行
vagrant up,启动虚拟机,验证磁盘是否生效;1 2 3 4 5 6 7 8 9 10 11 12 13 14 15 16 17 18 19 20 21 22 23 24 25 26 27
$ vagrant up # fdisk -l Disk /dev/sda: 10.5 GB, 10485760000 bytes, 20480000 sectors Units = sectors of 1 * 512 = 512 bytes Sector size (logical/physical): 512 bytes / 512 bytes I/O size (minimum/optimal): 512 bytes / 512 bytes Disk label type: dos Disk identifier: 0x0000ca5e Device Boot Start End Blocks Id System /dev/sda1 * 2048 1026047 512000 83 Linux /dev/sda2 1026048 20479999 9726976 8e Linux LVM Disk /dev/sdb: 21.5 GB, 21474836480 bytes, 41943040 sectors Units = sectors of 1 * 512 = 512 bytes Sector size (logical/physical): 512 bytes / 512 bytes I/O size (minimum/optimal): 512 bytes / 512 bytes Disk /dev/mapper/centos-root: 8866 MB, 8866758656 bytes, 17317888 sectors Units = sectors of 1 * 512 = 512 bytes Sector size (logical/physical): 512 bytes / 512 bytes I/O size (minimum/optimal): 512 bytes / 512 bytes Disk /dev/mapper/centos-swap: 1048 MB, 1048576000 bytes, 2048000 sectors Units = sectors of 1 * 512 = 512 bytes Sector size (logical/physical): 512 bytes / 512 bytes I/O size (minimum/optimal): 512 bytes / 512 bytes
- 看效果
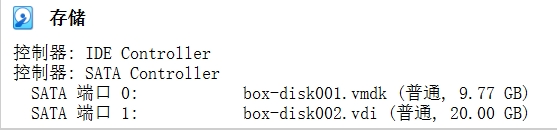 VirtualBox增加新磁盘 效果图
- 使用
/dev/sdb创建后,可以进行磁盘分区了1 2 3 4 5 6 7 8 9 10 11 12 13 14 15 16 17 18 19 20 21 22 23 24 25 26 27 28 29 30
# fdisk /dev/sdb Welcome to fdisk (util-linux 2.23.2). Changes will remain in memory only, until you decide to write them. Be careful before using the write command. Device does not contain a recognized partition table Building a new DOS disklabel with disk identifier 0x97757704. // n 增加分区;m 列出菜单 Command (m for help): n Partition type: p primary (0 primary, 0 extended, 4 free) e extended // 分区创建完成,p列出分区表查看,w保存退出 Select (default p): p Partition number (1-4, default 1): 1 First sector (2048-41943039, default 2048): Using default value 2048 Last sector, +sectors or +size{K,M,G} (2048-41943039, default 41943039): Using default value 41943039 Partition 1 of type Linux and of size 20 GiB is set Command (m for help): w The partition table has been altered! Calling ioctl() to re-read partition table. Syncing disks.
重新载入磁盘分区信息
fdisk只是把分区信息写到磁盘,在格式化分区值之前,需要用partprobe让kernel重新读取分区信息,如果不成功需要重启系统。1 2
// 运行后没返回信息,就表示磁盘信息载入成功 # partprobe /dev/sdb
格式化磁盘分区
1
2
3
4
5
6
7
8
9
10
11
12
13
14
15
16
17
18
19
20
21
22
23
24
 # mkfs.ext4 /dev/sdb
 mke2fs 1.42.9 (28-Dec-2013)
 /dev/sdb is entire device, not just one partition!
 Proceed anyway? (y,n) y
 Filesystem label=
 OS type: Linux
 Block size=4096 (log=2)
 Fragment size=4096 (log=2)
 Stride=0 blocks, Stripe width=0 blocks
 1310720 inodes, 5242880 blocks
 262144 blocks (5.00%) reserved for the super user
 First data block=0
 Maximum filesystem blocks=2153775104
 160 block groups
 32768 blocks per group, 32768 fragments per group
 8192 inodes per group
 Superblock backups stored on blocks:
         32768, 98304, 163840, 229376, 294912, 819200, 884736, 1605632, 2654208,
         4096000

 Allocating group tables: done
 Writing inode tables: done
 Creating journal (32768 blocks): done
 Writing superblocks and filesystem accounting information: done
格式化完成后续优化配置,取消磁盘自检
1
2
3
 # tune2fs -c -1 /dev/sdb
 tune2fs 1.42.9 (28-Dec-2013)
 Setting maximal mount count to -1
分区挂载
1
 # mount /dev/sdb /var/lib/docker/
配置开机自动挂载分区
1
2
 // 编辑/etc/fstab
 /dev/sdb    /var/lib/docker      ext4    errors=remount-ro 0 1
查看磁盘分区信息
1
2
3
4
5
6
7
8
9
10
11
12
13
14
15
16
17
18
19
 # lsblk
 NAME            MAJ:MIN RM  SIZE RO TYPE MOUNTPOINT
 sda               8:0    0  9.8G  0 disk
 ├─sda1            8:1    0  500M  0 part /boot
 └─sda2            8:2    0  9.3G  0 part
   ├─centos-root 253:0    0  8.3G  0 lvm  /
   └─centos-swap 253:1    0 1000M  0 lvm  [SWAP]
 sdb               8:16   0   20G  0 disk /var/lib/docker
 # df -h
 Filesystem               Size  Used Avail Use% Mounted on
 /dev/mapper/centos-root  8.3G  7.1G  1.3G  86% /
 devtmpfs                 3.9G     0  3.9G   0% /dev
 tmpfs                    3.9G     0  3.9G   0% /dev/shm
 tmpfs                    3.9G  8.6M  3.9G   1% /run
 tmpfs                    3.9G     0  3.9G   0% /sys/fs/cgroup
 /dev/sda1                497M  164M  334M  33% /boot
 tmpfs                    783M     0  783M   0% /run/user/0
 none                      79G   58G   21G  74% /vagrant
 /dev/sdb                  20G   45M   19G   1% /var/lib/docker
vagrant打包成新镜像,新镜像初始化后,再次用vagrant启动时,就没必要加第二步的磁盘挂载代码了。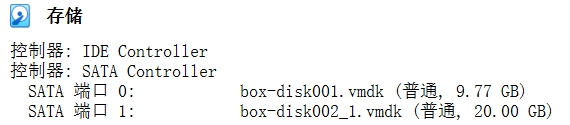 VirtualBox增加新磁盘 效果图
硬盘扩容(不删除原数据)
vagrant最初设计定位是快速还原运行环境,在虚拟机初始化阶段不会留出很足的主硬盘空间。使用fdisk -l和df -h命令查看硬盘,主硬盘(/dev/sda)总空间默认情况下只有10G,但是一般的系统镜像初始大小就超过9G了。
1
2
3
4
5
6
7
8
9
10
11
12
13
14
15
16
17
18
19
20
21
22
23
24
25
26
27
28
29
30
31
32
33
34
35
36
37
38
39
40
41
# fdisk -l

Disk /dev/sda: 10.5 GB, 10485760000 bytes, 20480000 sectors
Units = sectors of 1 * 512 = 512 bytes
Sector size (logical/physical): 512 bytes / 512 bytes
I/O size (minimum/optimal): 512 bytes / 512 bytes
Disk label type: dos
Disk identifier: 0x0000ca5e

   Device Boot      Start         End      Blocks   Id  System
/dev/sda1   *        2048     1026047      512000   83  Linux
/dev/sda2         1026048    20479999     9726976   8e  Linux LVM


Disk /dev/sdb: 21.5 GB, 21474836480 bytes, 41943040 sectors
Units = sectors of 1 * 512 = 512 bytes
Sector size (logical/physical): 512 bytes / 512 bytes
I/O size (minimum/optimal): 512 bytes / 512 bytes


Disk /dev/mapper/centos-root: 8866 MB, 8866758656 bytes, 17317888 sectors
Units = sectors of 1 * 512 = 512 bytes
Sector size (logical/physical): 512 bytes / 512 bytes
I/O size (minimum/optimal): 512 bytes / 512 bytes


Disk /dev/mapper/centos-swap: 1048 MB, 1048576000 bytes, 2048000 sectors
Units = sectors of 1 * 512 = 512 bytes
Sector size (logical/physical): 512 bytes / 512 bytes
I/O size (minimum/optimal): 512 bytes / 512 bytes

# df -h
Filesystem               Size  Used Avail Use% Mounted on
/dev/mapper/centos-root  8.3G  7.0G  1.4G  84% /
devtmpfs                 3.9G     0  3.9G   0% /dev
tmpfs                    3.9G     0  3.9G   0% /dev/shm
tmpfs                    3.9G  8.6M  3.9G   1% /run
tmpfs                    3.9G     0  3.9G   0% /sys/fs/cgroup
/dev/sdb                  20G  1.3G   18G   7% /var/lib/docker
/dev/sda1                497M  164M  333M  34% /boot
tmpfs                    783M     0  783M   0% /run/user/0
10个G的主硬盘根本不够用,这时就不得不在保留原数据的情况下,对主硬盘进行扩容操作了。具体步骤如下,
扩容操作需要使用
vboxmanage命令,需要把VirtualBox的安装路径添加到PATH系统环境变量查看并记录原始硬盘信息,主要先关注
UUID1 2 3 4 5 6 7 8 9 10 11 12
$ vboxmanage showhdinfo "./box-disk001.vmdk" UUID: 68f3688b-8258-44c3-9a07-c12b8a251da3 Parent UUID: base State: created Type: normal (base) Location: D:\virtual\box\cdh1\box-disk001.vmdk Storage format: VMDK Format variant: dynamic default Capacity: 10000 MBytes Size on disk: 7874 MBytes Encryption: disabled In use by VMs: cdh1 (UUID: eaa95ea6-d48f-471a-8c4c-c4f7507b5f5c)
制作扩容硬盘
1
2
3
4
5
6
7
8
9
10
11
12
13
14
15
16
17
18
19
20
21
22
23
24
25
26
27
28
 // 先将原硬盘进行克隆,将硬盘克隆成了vdi格式后,就可以开始下一步的扩容操作了
 $ vboxmanage clonehd "./box-disk001.vmdk" "./box-disk001-clone.vdi" --format vdi
 0%...10%...20%...30%...40%...50%...60%...70%...80%...90%...100%
 Clone medium created in format 'vdi'. UUID: e4af2ce2-d267-448d-a821-3c014ef67d82

 // 扩容,其中30720单位为MB,即表示30G空间
 $ vboxmanage modifyhd "./box-disk001-clone.vdi" --resize 30720
 0%...10%...20%...30%...40%...50%...60%...70%...80%...90%...100%

 // 查看扩容后的容量
 $ vboxmanage showhdinfo ./box-disk001-clone.vdi
 UUID:           e4af2ce2-d267-448d-a821-3c014ef67d82
 Parent UUID:    base
 State:          created
 Type:           normal (base)
 Location:       D:\virtual\box\cdh1\box-disk001-clone.vdi
 Storage format: vdi
 Format variant: dynamic default
 Capacity:       30720 MBytes
 Size on disk:   7905 MBytes
 Encryption:     disabled
 Property:       AllocationBlockSize=1048576

 // 转回原来的格式,直接使用vdi格式也可以(建议不要直接覆盖原来的vmdk硬盘文件,以作备份)
 // 记录一下新vmdk文件的uuid信息,到这里,带有原数据和新尺寸的硬盘就制作完毕了。
 $ vboxmanage clonehd "./box-disk001-clone.vdi" "resized-disk001.vmdk" --format vmdk
 0%...10%...20%...30%...40%...50%...60%...70%...80%...90%...100%
 Clone medium created in format 'vmdk'. UUID: 4cd58fea-4e69-4d81-8419-dafdec853047
将新硬盘载入使用
查看新硬盘对应的
UUID,以便后边替换。1 2 3 4 5 6 7 8 9 10 11 12 13
$ vboxmanage showhdinfo "./resized-disk001.vmdk" UUID: 4cd58fea-4e69-4d81-8419-dafdec853047 Parent UUID: base State: created Type: normal (base) Location: D:\virtual\box\cdh1\resized-disk001.vmdk Storage format: vmdk Format variant: dynamic default Capacity: 30720 MBytes Size on disk: 7865 MBytes Encryption: disabled $ ren ./box-disk001.vmdk ./box-disk001-backup.vmdk $ ren ./resized-disk001.vmdk ./box-disk001.vmdk
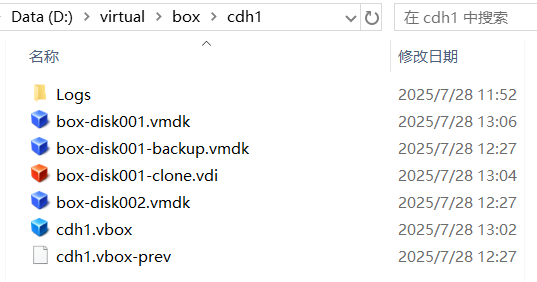 vbox 扩容中间产物 图示
载入上面创建好的新硬盘,有两个文件要修改,
.box配置文件和VirtualBox.xml配置文件,修改之前需要关闭VirtualBox进程,否则UUID修改不成功。- /virtual/boxes/cdh1/cdh1.vbox(替换新磁盘的
UUID) - ~/.VirtualBox/VirtualBox.xml(删除中间生成的产物
MediaRegistry)
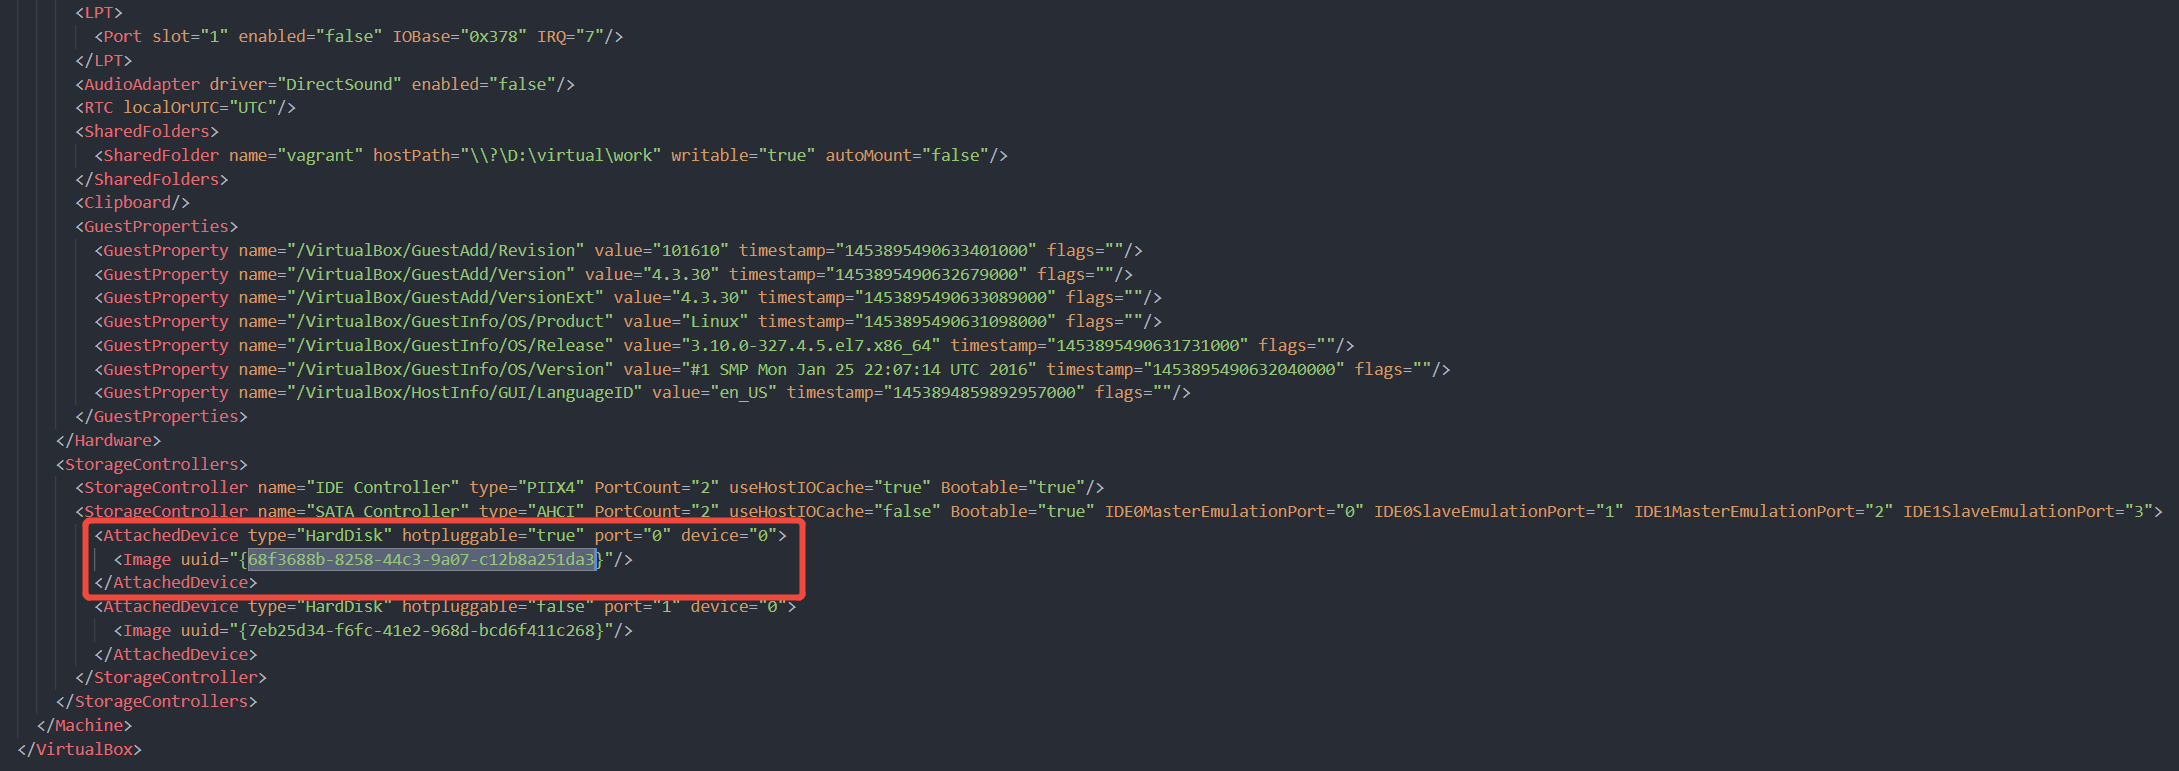 .box配置文件修改1 图示
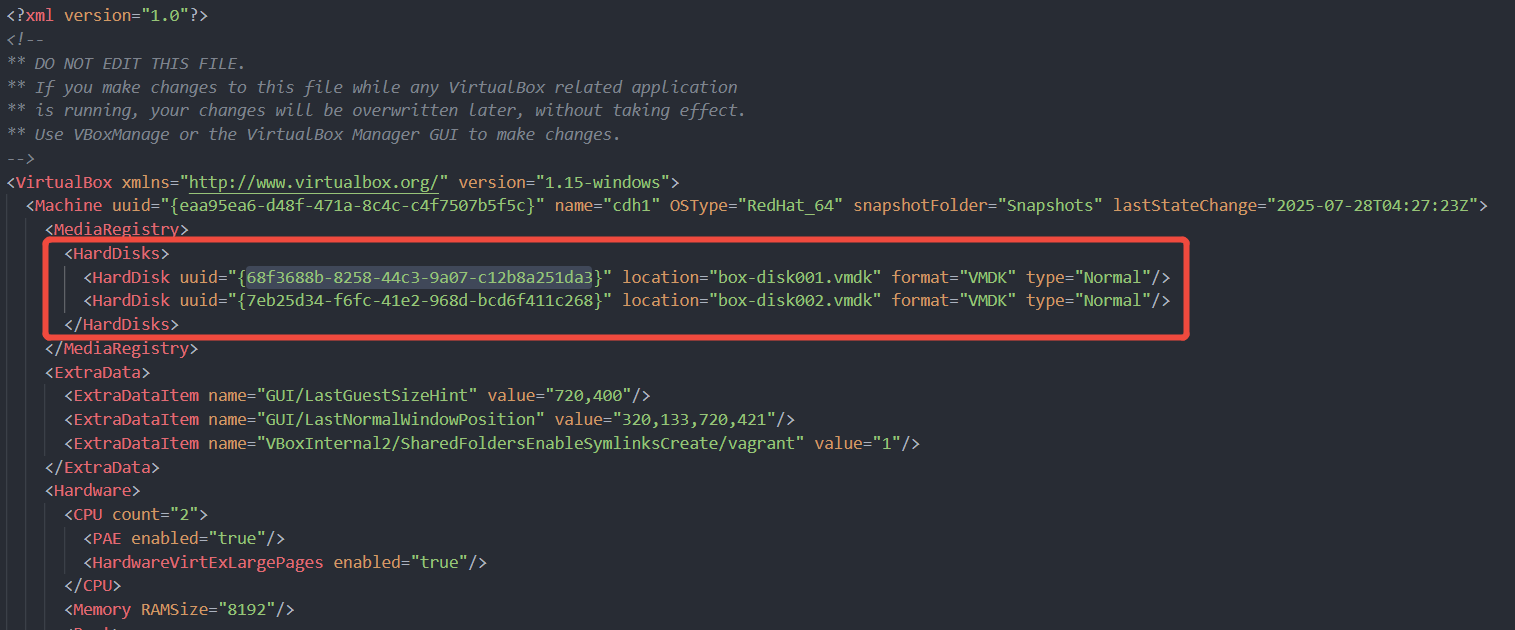 .box配置文件修改2 图示
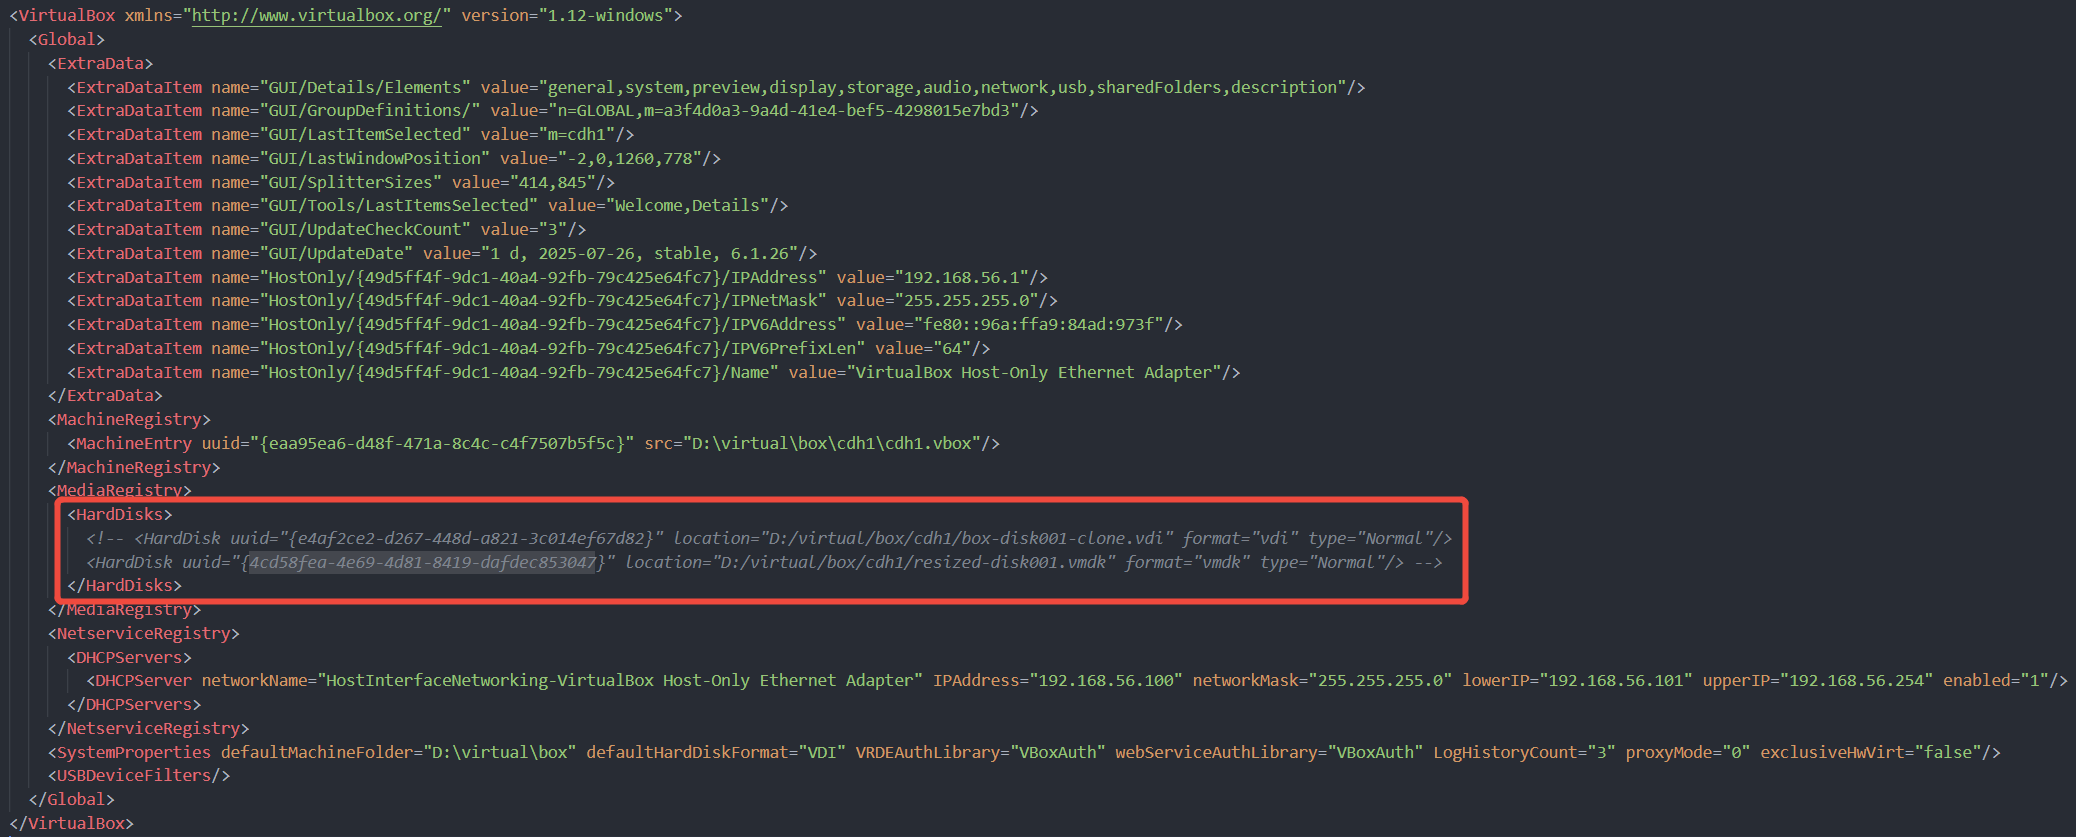 VirtualBox.xml配置文件(注册中心)修改 图示
重启虚拟机(
reboot,或者vagrant reload),并添加分区。1 2 3 4 5 6 7 8 9 10 11 12 13 14 15 16 17 18 19 20 21 22 23 24 25 26 27 28 29 30 31 32 33 34 35 36 37 38 39 40 41 42 43 44 45 46 47 48 49 50 51 52 53 54 55 56 57 58 59 60 61 62 63 64 65 66 67 68 69 70 71 72 73 74 75 76 77 78
# fdisk /dev/sda Welcome to fdisk (util-linux 2.23.2). Changes will remain in memory only, until you decide to write them. Be careful before using the write command. Command (m for help): n Partition type: p primary (2 primary, 0 extended, 2 free) e extended Select (default p): p Partition number (3,4, default 3): 3 First sector (20480000-62914559, default 20480000): Using default value 20480000 Last sector, +sectors or +size{K,M,G} (20480000-62914559, default 62914559): Using default value 62914559 Partition 3 of type Linux and of size 20.2 GiB is set // 改变分区格式 Command (m for help): t // 选择第3分区 Partition number (1-3, default 3): 3 // 输入8e转成LVM格式 Hex code (type L to list all codes): 8e Changed type of partition 'Linux' to 'Linux LVM' Command (m for help): w The partition table has been altered! Calling ioctl() to re-read partition table. WARNING: Re-reading the partition table failed with error 16: Device or resource busy. The kernel still uses the old table. The new table will be used at the next reboot or after you run partprobe(8) or kpartx(8) Syncing disks. # fdisk -l Disk /dev/sda: 32.2 GB, 32212254720 bytes, 62914560 sectors Units = sectors of 1 * 512 = 512 bytes Sector size (logical/physical): 512 bytes / 512 bytes I/O size (minimum/optimal): 512 bytes / 512 bytes Disk label type: dos Disk identifier: 0x0000ca5e Device Boot Start End Blocks Id System /dev/sda1 * 2048 1026047 512000 83 Linux /dev/sda2 1026048 20479999 9726976 8e Linux LVM /dev/sda3 20480000 62914559 21217280 8e Linux LVM Disk /dev/sdb: 21.5 GB, 21474836480 bytes, 41943040 sectors Units = sectors of 1 * 512 = 512 bytes Sector size (logical/physical): 512 bytes / 512 bytes I/O size (minimum/optimal): 512 bytes / 512 bytes Disk /dev/mapper/centos-root: 8866 MB, 8866758656 bytes, 17317888 sectors Units = sectors of 1 * 512 = 512 bytes Sector size (logical/physical): 512 bytes / 512 bytes I/O size (minimum/optimal): 512 bytes / 512 bytes Disk /dev/mapper/centos-swap: 1048 MB, 1048576000 bytes, 2048000 sectors Units = sectors of 1 * 512 = 512 bytes Sector size (logical/physical): 512 bytes / 512 bytes I/O size (minimum/optimal): 512 bytes / 512 bytes // 到现在看,虽然/dev/sda3分区被创建了,但是还没有真正挂载使用,最好是把这个新分区扩展到centos vg组。 # df -h Filesystem Size Used Avail Use% Mounted on /dev/mapper/centos-root 8.3G 7.0G 1.4G 84% / devtmpfs 3.9G 0 3.9G 0% /dev tmpfs 3.9G 0 3.9G 0% /dev/shm tmpfs 3.9G 8.6M 3.9G 1% /run tmpfs 3.9G 0 3.9G 0% /sys/fs/cgroup /dev/sdb 20G 1.3G 18G 7% /var/lib/docker /dev/sda1 497M 164M 333M 34% /boot tmpfs 783M 0 783M 0% /run/user/0
- /virtual/boxes/cdh1/cdh1.vbox(替换新磁盘的
重启虚拟机(
reboot),把/dev/sda3新分区扩展到centos vg组1 2 3 4 5 6 7 8 9 10 11 12 13 14 15 16 17 18 19 20 21 22 23 24 25 26 27 28 29 30 31 32 33 34 35 36 37 38 39 40 41 42 43 44 45 46 47 48 49 50 51
// 查看VG name # pvdisplay | grep "VG Name" VG Name centos // 查看卷组 # vgdisplay --- Volume group --- VG Name centos System ID Format lvm2 Metadata Areas 1 Metadata Sequence No 3 VG Access read/write VG Status resizable MAX LV 0 Cur LV 2 Open LV 2 Max PV 0 Cur PV 1 Act PV 1 VG Size 9.27 GiB PE Size 4.00 MiB Total PE 2374 Alloc PE / Size 2364 / 9.23 GiB Free PE / Size 10 / 40.00 MiB VG UUID cpEmYK-XFew-6ZWT-GEeY-yEou-0vLq-OJiD08 // 给新分区创建物理卷 # pvcreate /dev/sda3 Physical volume "/dev/sda3" successfully created. // 把新分区扩展到centos这个组 [root@cdh1 ~]# vgextend centos /dev/sda3 Volume group "centos" successfully extended // 扩展逻辑分区 # lvextend /dev/mapper/centos-root /dev/sda3 Size of logical volume centos/root changed from <8.26 GiB (2114 extents) to <28.49 GiB (7293 extents). Logical volume centos/root successfully resized. // 更新文件系统,resize生效 # xfs_growfs /dev/mapper/centos-root meta-data=/dev/mapper/centos-root isize=256 agcount=4, agsize=541184 blks = sectsz=512 attr=2, projid32bit=1 = crc=0 finobt=0 data = bsize=4096 blocks=2164736, imaxpct=25 = sunit=0 swidth=0 blks naming =version 2 bsize=4096 ascii-ci=0 ftype=0 log =internal bsize=4096 blocks=2560, version=2 = sectsz=512 sunit=0 blks, lazy-count=1 realtime =none extsz=4096 blocks=0, rtextents=0 data blocks changed from 2164736 to 7468032
查看扩容后的效果,主硬盘扩容到30G,完!
1
2
3
4
5
6
7
8
9
10
 # df -h
     Filesystem               Size  Used Avail Use% Mounted on
     /dev/mapper/centos-root   29G  7.0G   22G  25% /
     devtmpfs                 3.9G     0  3.9G   0% /dev
     tmpfs                    3.9G     0  3.9G   0% /dev/shm
     tmpfs                    3.9G  8.6M  3.9G   1% /run
     tmpfs                    3.9G     0  3.9G   0% /sys/fs/cgroup
     /dev/sdb                  20G  1.3G   18G   7% /var/lib/docker
     /dev/sda1                497M  164M  333M  34% /boot
     tmpfs                    783M     0  783M   0% /run/user/0
踩坑记录
VirtualBox因硬件虚拟化功能未启用而无法启动虚拟机1 2 3 4 5 6 7 8 9
==> cdh1: Booting VM... There was an error while executing `VBoxManage`, a CLI used by Vagrant for controlling VirtualBox. The command and stderr is shown below. Command: ["startvm", "97bee11c-78e9-45e4-be65-5eff9bdd7d82", "--type", "headless"] Stderr: VBoxManage.exe: error: Not in a hypervisor partition (HVP=0) (VERR_NEM_NOT_AVAILABLE). VBoxManage.exe: error: VT-x is disabled in the BIOS for all CPU modes (VERR_VMX_MSR_ALL_VMX_DISABLED) VBoxManage.exe: error: Details: code E_FAIL (0x80004005), component ConsoleWrap, interface IConsole解决方案:BIOS中启用VT-x(Intel Virtualization Technology)/AMD-V
VirtualBox在重命名虚拟机目录时检测到目标路径已存在(VERR_ALREADY_EXISTS)1 2 3 4 5 6 7 8 9 10 11 12
==> cdh1: Running 'pre-boot' VM customizations... A customization command failed: ["modifyvm", :id, "--name", "cdh1"] The following error was experienced: #<Vagrant::Errors::VBoxManageError:"There was an error while executing `VBoxManage`, a CLI used by Vagrant\nfor controlling VirtualBox. The command and stderr is shown belo w.\n\nCommand: [\"modifyvm\", \"dfb93ca8-cad6-478c-809f-60c7ecf7f686\", \"--name\", \"cdh1\"]\n\nStderr: VBoxManage.exe: error: Could not rename the directory 'C:\\Users\\m sy\\VirtualBox VMs\\work_cdh1_1752811636133_33428' to 'C:\\Users\\msy\\VirtualBox VMs\\cdh1' to save the settings file (VERR_ALREADY_EXISTS)\r\nVBoxManage.exe: error: Detai ls: code E_FAIL (0x80004005), component SessionMachine, interface IMachine, callee IUnknown\r\nVBoxManage.exe: error: Context: \"SaveSettings()\" at line 3265 of file VBoxM anageModifyVM.cpp\r\n">
解决方案:手动清理冲突目录,通过
VirtualBox GUI检查残留配置,检查虚拟机配置文件状态。